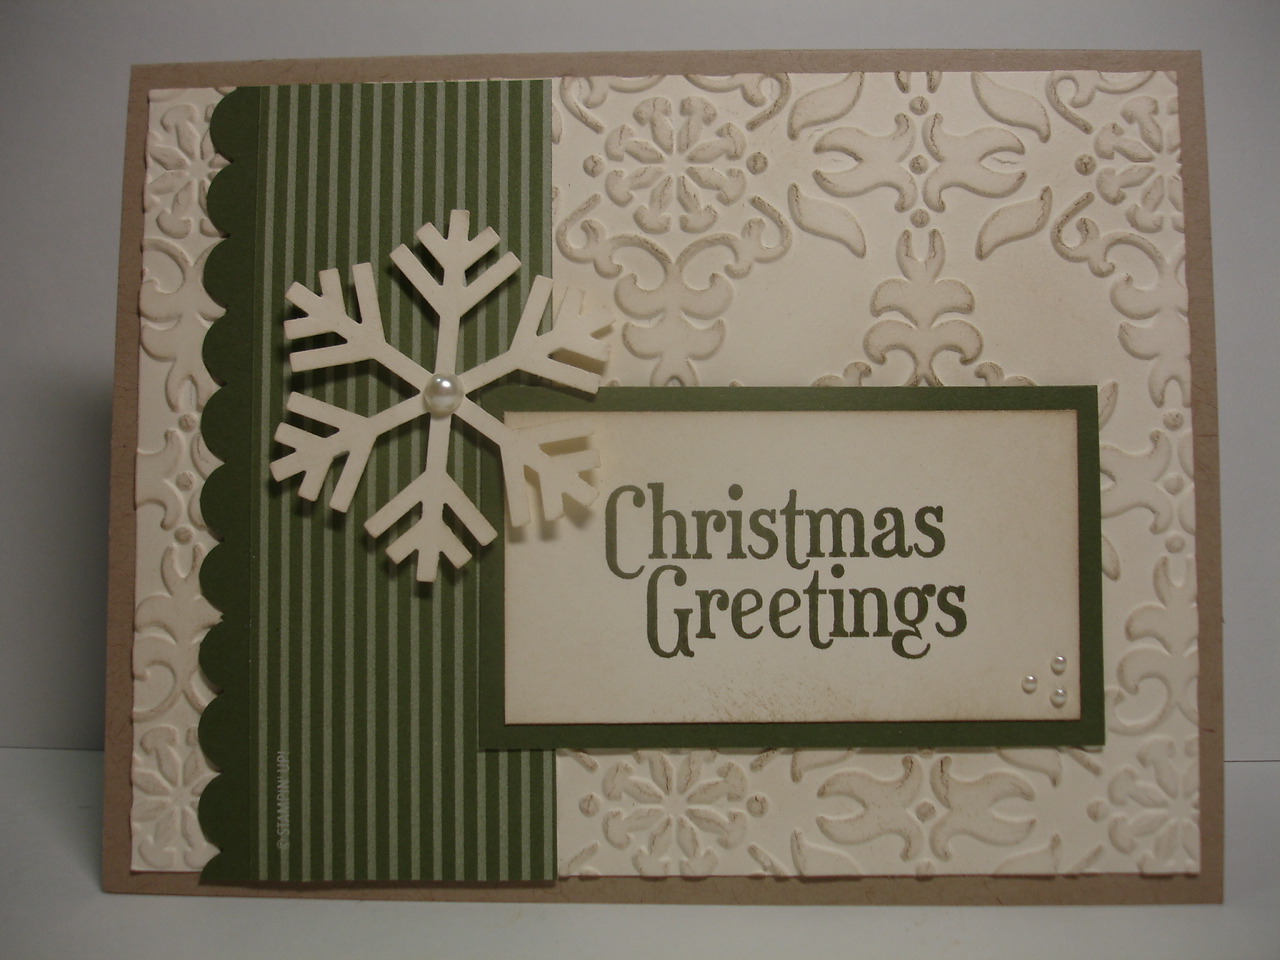
Hi there! Popping in real quick before I head to the airport to pick up our niece. This card was made at Carla Spradling's Card Buffet some months back. The stamp set was from Sale-a-bration called, Feeling Sentimental. Sorry it is no longer available through Stampin' Up! The embossed area was done with the now retired Vintage Wallpaper embossing folder.
Must run. Thank you for stopping by today!
Showing posts with label Vintage Wallpaper. Show all posts
Thursday, November 21, 2013
Thursday, May 23, 2013
Artistic Vintage
Hi there! Found this card posted on Joan Robertson's blog here while surfing the internet and decided to CASE (Copy And Share Everything) it. Joan has some informative videos, including a series on how to "step-up" a card. If you get a chance, take a look. Some of the products used will soon be retired - in just a little over a week! So sad. It's always difficult to say good-bye.
All Stampin' Up! supplies used unless otherwise noted
Stamps: Artistic Etchings, French Foliage (both sets retiring)
Paper: Crumb Cake, Vanilla, Wisteria Wonder
Ink: Black StazOn, Crumb Cake, Sahara Sand, Wisteria Wonder
Other: Vintage Wallpaper embossing folder (retiring), Wisteria Wonder 3/8" Ruffled Ribbon (retiring)
Remember - you only have until May 31st to order the retiring products! Well actually, Stampin' Up! is extending the time period through June 3rd (or while supplies last).
That's it for now. Thanks for checking out the blog today!
All Stampin' Up! supplies used unless otherwise noted
Stamps: Artistic Etchings, French Foliage (both sets retiring)
Paper: Crumb Cake, Vanilla, Wisteria Wonder
Ink: Black StazOn, Crumb Cake, Sahara Sand, Wisteria Wonder
Other: Vintage Wallpaper embossing folder (retiring), Wisteria Wonder 3/8" Ruffled Ribbon (retiring)
Remember - you only have until May 31st to order the retiring products! Well actually, Stampin' Up! is extending the time period through June 3rd (or while supplies last).
That's it for now. Thanks for checking out the blog today!
Tuesday, August 30, 2011
More August Stamp Camp Cards
Hi there! Gonna post real quick the other cards from Camp held on Saturday. Love, love, love this new background stamp, Hello Doily! I used the Always Artichoke Denim ribbon that is new to the catalog this year. It also comes in blue, which looks like jeans. (Really? Blue looking like jeans? Huh, how 'bout that! lol)
All SU! supplies used unless otherwise noted.
The last card is from a new set in the 2011-2012 IBC (Inspiration Book & Catalog) called Button Buddies. Too cute! So many possibilities with this set. Made a little "snail trail" with Dazzling Details, which is in the Holiday Mini and available Sep 1st.
Today we can register for the Louisville, KY Regional. About half of the Pieces of Heart Stampers will be attending. We have another Demo not affiliated with our group but we love her just the same. Whoo Hoo! Another road trip with my favorite Demo peeps! This is an all day event - unlike the Branson Regional which was only a half day. Looking forward to it! A new adventure. Never been to Louisville.
![]() |
| Open view |
Stamps: Hello Doily, Love & Care (Hostess set in Summer Mini - avail until 31 Aug), Word Play
Paper: White, Rich Razzleberry, Crumb Cake
Ink: Rich Razzleberry pad & marker, Crumb Cake, Always Artichoke pad & marker
Tools: Vintage Wallpaper embossing folder, distressing tool (optional)
Other: Rich Razzleberry 1/4” grosgrain ribbon, Always Artichoke 3/8” denim jean ribbon, sponges
Inspiration: Eileen Lefevre http://elefevre.blogspot.com posted 20 aug 11 The last card is from a new set in the 2011-2012 IBC (Inspiration Book & Catalog) called Button Buddies. Too cute! So many possibilities with this set. Made a little "snail trail" with Dazzling Details, which is in the Holiday Mini and available Sep 1st.
![]() | |
| inside Mr Snail is slithering along! |
Stamps: Button Buddies, Inspired by Nature, Happiest Birthday Wishes (Hostess set), On Your Birthday
Paper: Early Espresso, White, Old Olive, Brights DSP Stack
Ink: Early Espresso, Old Olive - pad & markers
Tools: Mat pack & paper piercer, 3/4” circle punch, acrylic blocks
Other: Buttons, Dazzling Details (available Sep 1), dimensionals, glue dots
Inspiration: Kathy Tanner www.stampingstill.blogspot.com Jul 4, 2011 post
Today we can register for the Louisville, KY Regional. About half of the Pieces of Heart Stampers will be attending. We have another Demo not affiliated with our group but we love her just the same. Whoo Hoo! Another road trip with my favorite Demo peeps! This is an all day event - unlike the Branson Regional which was only a half day. Looking forward to it! A new adventure. Never been to Louisville.
OK, I'm out of here - meeting friends for coffee. Have a great day and thank you for stopping by!
Thursday, August 4, 2011
July Stamp Camp Cards
Hi there! Hope everyone is having a good week. We're supposed to have a cold front move in. Brrrr! Temperatures will only be in the lower 90's this week! lol
It's been another busy week. Busy is good, though. Today I'm sharing with you three of the cards my Camp attendees made last Saturday. The first one is from the Delicate Doilies set stamped with White Craft ink. Crumb Cake seam binding is threaded through the punched border strip. (Secure ends to back of strip with glue dots.)
All Stampin' Up! supplies used unless otherwise noted
Thanks for visiting today. Please come back tomorrow for the remaining Camp cards.
Keep on Stamping!
It's been another busy week. Busy is good, though. Today I'm sharing with you three of the cards my Camp attendees made last Saturday. The first one is from the Delicate Doilies set stamped with White Craft ink. Crumb Cake seam binding is threaded through the punched border strip. (Secure ends to back of strip with glue dots.)
All Stampin' Up! supplies used unless otherwise noted
Stamps: Delicate Doilies
Paper: Crumb Cake, White
Ink: White Craft
Tools: Lace Ribbon border punch
Other: Crumb Cake seam binding (9” length), glue dots
Inspiration: Melissa Davies card posted on Diana Gibbs blog Jun 28, 2011
Stamps: Fabulous Florets
Paper: Daffodil Delight, Black, Island Indigo, White
Ink: Black
Tools: Distressing tool, Finial Press embossing folder
Other: Dimensionals
Inspiration: Carla Spradling – Summer Celebration Demo swap (May 2011) www.WhatsInkin.stampinup.net
And how about a Christmas in July (well, it was July the day of Stamp Camp!)
Inspiration: Carla Spradling – Summer Celebration Demo swap (May 2011) www.WhatsInkin.stampinup.net
And how about a Christmas in July (well, it was July the day of Stamp Camp!)
All Stampin' Up! supplies used unless otherwise noted
Stamps: Grateful Greetings
Paper: Crumb Cake, Very Vanilla, Always Artichoke, Regals DSP Pack – Always Artichoke patterned paper
Ink: Crumb Cake, Always Artichoke
Tools: Snowflake punch, Scallop border punch, Vintage Wallpaper embossing folder
Other: Pearls, sponges, dimensionals
Inspiration: Kari Eklund on Stampin Connection Nov 10, 2010 (adaptation of Jill Hillard's card)Thanks for visiting today. Please come back tomorrow for the remaining Camp cards.
Keep on Stamping!
Monday, July 4, 2011
Happy 4th!!
Hi there. Hope everyone is having a good 4th of July! I've just been relaxing today - had lunch with a friend and did a teeny bit of shopping. Other than that, a pretty low key day.
This morning I started working on my July Stamp Camp projects. While flipping through a stack of "inspiration" cards, I came across a couple of cards that were misfiled (how'd that happen?) and never got posted to the blog. These girly-girl cards were made with the weekly Wed stamp group (aka, the Wednesday girls). Monica Gale's princess card is just too cute! Thank you Monica for the inspiration. You can view her card by clicking here.
Here is the first card:
Punch out the bodice using the Tab punch. Use the 3/4" circle punch to scoop out the neckline. I punched out vellum with the Scallop oval punch (if you use some card stock scraps under the vellum, the punch will work better. If I had SU! vellum that wouldn't be necessary!). I then ran the ovals through my Big Shot using the Vintage Wall embossing folder. Glue 3-4 ovals to bottom portion of tab bodice (don't worry the tab won't show after you adhere all the vellum layers). Glue 2-3 more on top. Add a bow at the waist and pearls at the neckline to finish off your frilly dress. This would make a cute bridal shower card or a girls birthday card - especially if she does ballet. Can you say tutu! lol
Crumb Cake card base = 5-1/2" x 8-1/2"
White layer = 4" x 5-1/4"
Blushing Bride DSP = 3-3/4" x 5"
White layer = 3-1/4" x 4-1/4"
Crumb Cake layer = 3" x 4"
Here is the same card - different color:
The patterned paper for this version is retired Bashful Blue DSP - sorry! The ribbon is non-SU! Everything else is the same as the pink card. If you decide to make Monica's card, I'd love to see your version.
OK, gonna scoot on out of here for today. Enjoy what's left of the holiday and be safe with those fireworks! Thanks for stopping by.
This morning I started working on my July Stamp Camp projects. While flipping through a stack of "inspiration" cards, I came across a couple of cards that were misfiled (how'd that happen?) and never got posted to the blog. These girly-girl cards were made with the weekly Wed stamp group (aka, the Wednesday girls). Monica Gale's princess card is just too cute! Thank you Monica for the inspiration. You can view her card by clicking here.
Here is the first card:
![]() |
| Blushing Bride version |
Crumb Cake card base = 5-1/2" x 8-1/2"
White layer = 4" x 5-1/4"
Blushing Bride DSP = 3-3/4" x 5"
White layer = 3-1/4" x 4-1/4"
Crumb Cake layer = 3" x 4"
Stampin' Up! supplies used unless otherwise noted.
Paper: Crumb Cake, White, In Color DSP, Vellum (non-SU!)
Tools: Vintage Wallpaper embossing folder, Tab punch, Scallop oval punch, 3/4" circle punch
Other: Pearls, 1/4" pink ribbon (non-SU!)Here is the same card - different color:
![]() | ||
| Bashful Blue version |
OK, gonna scoot on out of here for today. Enjoy what's left of the holiday and be safe with those fireworks! Thanks for stopping by.
Wednesday, May 11, 2011
Binder Clip Picture Frame and a Graduation Card
Hi there - Happy Hump Day! Hope everyone is having a good week. We had a great time at Patty's last night. The smoothies didn't disappoint - so yummy! Thanks Don!!!
I've been so behind showing you the great projects we've been making at our Demo Stamp Camps. Last month Mary Ellen Cope hosted (and her husband made some yummy sloppy joes for us!). Here is one of the projects we made.
Isn't this pretty? It can be used as a picture frame or a 6x6 scrapbook page. The DSP is Love Letter, which coordinates with Riding Hood Red card stock. The embellishments around the frame were made by using Artistic Etchings stamps with Very Vanilla Craft ink and embossing powder. Cut them out and pop them up with dimensionals. A strip of DSP was wrapped around the binder clip (sold at office supply stores) and glued in place. I used a black marker to ink up only the "happiness" portion of the sentiment from one of the Heard from the Heart stamps. That was punched out with the Modern Label punch. A second label in Riding Hood Red was punched out, cut in half, and adhered to the ends of the Very Vanilla label. The frame was made by gutting out middle portion of a 4-1/4" x 5-1/2" piece of black card stock, then embossed using the Vintage Wallpaper embossing folder. Adhere to the DSP - leave top open for your photo!
Mary Ellen also had a graduation card for us to make. I didn't have anyone graduating so I gave the card to a friend who needed one. The diploma was made by rolling up a Modern Label punched piece. Wasn't she the clever one! It's easier to roll up if you break down the fibers first. This can be achieved by pulling it across the edge of your desk or table. The tassel was made with embroidery floss and secured in the "mortar board" with a brad.
Recipe
Stamps: Teeny Tiny Wishes
Paper: Real Red, More Mustard, Whisper White, Black
Ink: Real Red
Other: Framed Tulips embossing folder, Photo Corner punch, gold embroidery floss, Modern Label punch, black brad, mat pack
I've been so behind showing you the great projects we've been making at our Demo Stamp Camps. Last month Mary Ellen Cope hosted (and her husband made some yummy sloppy joes for us!). Here is one of the projects we made.
Isn't this pretty? It can be used as a picture frame or a 6x6 scrapbook page. The DSP is Love Letter, which coordinates with Riding Hood Red card stock. The embellishments around the frame were made by using Artistic Etchings stamps with Very Vanilla Craft ink and embossing powder. Cut them out and pop them up with dimensionals. A strip of DSP was wrapped around the binder clip (sold at office supply stores) and glued in place. I used a black marker to ink up only the "happiness" portion of the sentiment from one of the Heard from the Heart stamps. That was punched out with the Modern Label punch. A second label in Riding Hood Red was punched out, cut in half, and adhered to the ends of the Very Vanilla label. The frame was made by gutting out middle portion of a 4-1/4" x 5-1/2" piece of black card stock, then embossed using the Vintage Wallpaper embossing folder. Adhere to the DSP - leave top open for your photo!
Mary Ellen also had a graduation card for us to make. I didn't have anyone graduating so I gave the card to a friend who needed one. The diploma was made by rolling up a Modern Label punched piece. Wasn't she the clever one! It's easier to roll up if you break down the fibers first. This can be achieved by pulling it across the edge of your desk or table. The tassel was made with embroidery floss and secured in the "mortar board" with a brad.
Recipe
Stamps: Teeny Tiny Wishes
Paper: Real Red, More Mustard, Whisper White, Black
Ink: Real Red
Other: Framed Tulips embossing folder, Photo Corner punch, gold embroidery floss, Modern Label punch, black brad, mat pack
Subscribe to:
Posts (Atom)