Showing posts with label Occasions mini. Show all posts
Friday, April 8, 2016
Drapery Fold Technique
Hi there! Boy, this week sure flew by! So without further adieu, let's get to the card. The "drapery" fold technique seems to be all the rage on Pinterest , so I decided to give it a try. I used some retired Designer Series Paper called, Twitterpated for the "drapery". Unfortunately, the fold doesn't show up very well in the photo. The flower was made using the Botanical Builder Framelits, which can be found in the 2016 Stampin' Up! Ocassions Catalog. The sentiment is from the Wetlands set. One of my favorite sets.
Better get this posted before it's tomorrow. Have a great weekend and thanks for stopping in today!
Friday, March 25, 2016
Such a Lamb!
Hi there! Dropping in real quick to show you a card made at Jayne Singleton's Stamp Camp this past Sunday. Thought it was perfect to send to my infant grandson for his first Easter. Even though he is too young to appreciate a card from grandma, his mom will. lol This cute little Easter Lamb can be found in the Stampin' Up! 2016 Occasions Catalog. It is a single stamp, which could also be used to congratulate anyone with a new baby. The Wildflower Fields Designer Series Paper is a Sale-A-Bration freebie (with a qualifying purchase).
Must get to bed. Thank you for stopping in today!
Friday, March 11, 2016
Picture Perfect Tide
Hi there! Been taking care of business today but wanted to share the card I made for my daughter and son-in-law's upcoming anniversary. They were married on the beach in Florida, which is why I chose to use a soft color palette and watercolor background. Love the starfish image from Picture Perfect. It's a new set in the 2016 Stampin' Up! Occasions Catalog and definitely a keeper. The coral image is from By the Tide - another favorite set of mine. (Can you tell I love all things beachy? lol) A couple of other new items used from the Occasions Catalog are the Number of Years stamp set and coordinating Framelits called, Large Numbers. There are other images in the stamp set besides numbers, which makes it a versatile set. It can be purchased as a bundle to save you some dough! That's always a plus.
Need to get to bed. Still haven't caught up on sleep from the crop last weekend. Thank you for stopping by to visit today!
Tuesday, January 5, 2016
Occasions Catalog & Sale-A-Bration Go Live Today!!!
Hi there! It's an exciting day because the new 2016 Occasions Catalog AND Sale-A-Bration goes live today! The Occasions Catalog runs through May 31st and contains some awesome products and bundles! (Don't worry - the Annual or "big" catalog is still current.)
Sale-A-Bration is the biggest sale of the year at Stampin' Up!, where you earn FREE product for every $50 in merchandise you spend! Sale-A-Bration ends March 31st. Items on pages 16-19 will only be available through Feb 15th. New items will then be introduced for the remainder of the Sale-A-Bration period. (This is something new at Stampin' Up!)
Please contact me to place an order, if you do not already have a Demonstrator. You can click on the images in the right side bar to view the products. Thank you in advance!
Wednesday, December 2, 2015
Acorny Thank You
Hi there! Can you believe it's December already? Yikes! Thought I'd share one of the cards featured in my Card Buffet line-up. Stampin' Up!'s set, Acorny Thank You, was used and can be found in the 2015 Holiday Catalog. There is a coordinating punch for the acorns, too. The stamp set and punch are being carried over in the 2016 Occasions Catalog, which will be coming out soon. Both can be purchased as a bundle, saving you some moolah. (We Demonstrators get to place our pre-order from the new Ocassions Catalog tomorrow!) OK, back to the card. The feathers had to be cut out with snips, which was easy peasy. A small Baker's Twine bow was the finishing touch. Inspiration for this card came from Susan Itell. Love her style! You may view Susan's card HERE.
Need to run errands. Thank you for stopping by today!
Thursday, February 26, 2015
Watercolored Painted Petals
Hi there everyone. Thought I'd better post something before you all lose interest and I forget how to post. (That's assuming anyone out there does read my blog.) Thank you for being patient during my absence. Life has/is crazy busy with legal issues and sorting through my husband's personal effects. I don't know how often I'll post, but for now here is a 3x3 note card that was slipped into each customer's order bag in January.
This set called, Painted Petals, appears in the 2015 Occasions catalog. Love it! There is also a suite of coordinating products - Painted Blooms Designer Series Paper, Painted Blooms Cotton Twine, and the Spring Flowers embossing folder.
The watercolor effect for the notecard was achieved by first spritzing some water onto the watercolor paper, then spritz the stamp before applying to the paper. Each project will vary, depending on the amount of spritzing. That's OK because each one will be a mini work of art.
Must tend to some household chores and paperwork. Thank you so much for coming by today!
This set called, Painted Petals, appears in the 2015 Occasions catalog. Love it! There is also a suite of coordinating products - Painted Blooms Designer Series Paper, Painted Blooms Cotton Twine, and the Spring Flowers embossing folder.
The watercolor effect for the notecard was achieved by first spritzing some water onto the watercolor paper, then spritz the stamp before applying to the paper. Each project will vary, depending on the amount of spritzing. That's OK because each one will be a mini work of art.
Must tend to some household chores and paperwork. Thank you so much for coming by today!
Monday, January 5, 2015
Masquerade Celebration
Hi there! Mary Taylor and I held our calendar class yesterday. Thank you to everyone who participated. We had such a good time because we have the BEST customers/friends!!!
Today's feature is from our December Card Buffet. This card could be used for the New Year or for Mardi Gras. Inspiration was derived from Brenda Anderson's card seen HERE (scroll to Oct 12 post). Thank you, Brenda. How clever to use the Mustache Framelit for a mask! Love that idea!
Remember - tomorrow is the kick off for the Occasions Catalog and Sale-A-Bration!!! Pretty sure you're gonna love the new products!
Must run - hubby being released from the hospital this morning. Thank you so much for stopping in today!
Today's feature is from our December Card Buffet. This card could be used for the New Year or for Mardi Gras. Inspiration was derived from Brenda Anderson's card seen HERE (scroll to Oct 12 post). Thank you, Brenda. How clever to use the Mustache Framelit for a mask! Love that idea!
Remember - tomorrow is the kick off for the Occasions Catalog and Sale-A-Bration!!! Pretty sure you're gonna love the new products!
Must run - hubby being released from the hospital this morning. Thank you so much for stopping in today!
All Stampin' Up! supplies used unless otherwise noted.
Stamps: Happy
Hour, Good Greetings (celebrate sentiment)
Paper: Crumb
Cake, Black, Elegant Eggplant, Vanilla, Champagne Glimmer
Ink: Memento
Black, Sakura Gelly Roll Stardust Clear pen for the bubbles (non-SU)
Tools: Mustache Framelit, Chalk Talk Framelits
(small oval for eyes), Feathers Framelits,
Star Border Punch
Other: glue dots
Wednesday, December 31, 2014
Birthday Herd
Hi there! Gosh, it's hard to believe this is the last day of the year - it sure went by FAST! That's a sure sign that I'm getting old, right? Lol Better just get to the card and not waste any more time. It's another card the girls made at Club this past Saturday, which uses a new set from the Stampin' Up! 2015 Occasions Catalog. This set cracked me up when I first saw it at the Catalog Kickoff earlier this month! It is called From the Herd. The card has more of a masculine feel (in my opinion) with the neutral tones, burlap ribbon, and Hardwood background.
You will be able to make purchases from the Occasions Catalog and earn free products from the Sale-A-Bration brochure beginning Tuesday, Jan 6th!!!!
Check out the Year End Clearance Sale before Jan 5th HERE. New items from the Holiday Catalog were added last week! Supplies are limited so don't miss out on those products at discounted prices!
Must finish up some things before heading out to a friend's house for a little New Year's Eve get together. Have a safe and Happy New Year! Thank you for stopping by today!
You will be able to make purchases from the Occasions Catalog and earn free products from the Sale-A-Bration brochure beginning Tuesday, Jan 6th!!!!
Check out the Year End Clearance Sale before Jan 5th HERE. New items from the Holiday Catalog were added last week! Supplies are limited so don't miss out on those products at discounted prices!
Must finish up some things before heading out to a friend's house for a little New Year's Eve get together. Have a safe and Happy New Year! Thank you for stopping by today!
All Stampin' Up! supplies used unless otherwise noted.
Stamps: From
the Herd, Hardwood
Paper: Early
Espresso, Crumb Cake
Ink: Early
Espresso
Tools: Oval Framelits, scissors
Other: Glue dots, Dimensionals, 1-1/4” Burlap ribbon,
Fast Fuse or red line tape
Monday, December 29, 2014
Basic Swallowtail Butterfly
Hi there and happy Monday! Hope you all had a happy holiday! Can you believe we're almost at the end of another year? The year flew by!
Yesterday I mentioned that I'd have a sample from Club. It is similar to a post from this past summer but an image from the new 2015 Occasion Catalog was incorporated into the mix. The out-of-the-box technique shown in Dawn Griffith's video is one that I felt the girls would like to learn. You can view her video HERE. The background was made by stamping the fern image from Butterfly Basics. This is a new set appearing in the 2015 Occasions Catalog, which goes live January 6. (You are gonna love this new catalog!)
Must get going since the granddaughter is still here. Thanks for coming by for a visit today!
Yesterday I mentioned that I'd have a sample from Club. It is similar to a post from this past summer but an image from the new 2015 Occasion Catalog was incorporated into the mix. The out-of-the-box technique shown in Dawn Griffith's video is one that I felt the girls would like to learn. You can view her video HERE. The background was made by stamping the fern image from Butterfly Basics. This is a new set appearing in the 2015 Occasions Catalog, which goes live January 6. (You are gonna love this new catalog!)
Must get going since the granddaughter is still here. Thanks for coming by for a visit today!
All Stampin' Up! supplies used unless otherwise noted.
Stamps: Swallowtail
Butterfly, Butterfly Basics
Paper: Lost
Lagoon, Pool Party, White
Ink: Black
Memento, Pool Party, Pool Party marker, Lost Lagoon marker
Tools: Oval Framelits, scissors
Other: Pencil, eraser, clear blocks, foam mat
Monday, December 22, 2014
Butterfly Basics Sneak Peek
Hi there! Hope everyone had a great weekend. Seems that a lot of people are sick, though. It's bad enough being sick, but at this time of year.....doubly bad!
This past weekend I spent a little time in the studio and played around with the new Butterfly Basics set from Stampin' Up!, which is in the new 2014 Occasions Catalog. Loving this set! (Actually, there are a bunch of awesome products in the new catalog AND in the Sale-A-Bration brochure! Just sayin') Cherry Cobbler and Old Olive Blendabilities were used to color the flowers. I didn't spend much time coloring/shading, just quick strokes to fill in the petals and leaves. At first, I was going to leave the flowers as they were (stamped in black). They just didn't look right and were begging for color! Lol That really made a difference.
OK, must run to an appointment. Thanks for stopping in today!
All Stampin' Up! supplies used unless otherwise noted.
Stamps: Butterfly Basics
Paper: Real Red, Crumb Cake, Black
Ink: Crumb Cake, Memento Black, Cherry Cobbler and Old Olive Blendabilities
This past weekend I spent a little time in the studio and played around with the new Butterfly Basics set from Stampin' Up!, which is in the new 2014 Occasions Catalog. Loving this set! (Actually, there are a bunch of awesome products in the new catalog AND in the Sale-A-Bration brochure! Just sayin') Cherry Cobbler and Old Olive Blendabilities were used to color the flowers. I didn't spend much time coloring/shading, just quick strokes to fill in the petals and leaves. At first, I was going to leave the flowers as they were (stamped in black). They just didn't look right and were begging for color! Lol That really made a difference.
OK, must run to an appointment. Thanks for stopping in today!
All Stampin' Up! supplies used unless otherwise noted.
Stamps: Butterfly Basics
Paper: Real Red, Crumb Cake, Black
Ink: Crumb Cake, Memento Black, Cherry Cobbler and Old Olive Blendabilities
Friday, December 5, 2014
Gift Card Present
Hi there! Yesterday was a busy day - just didn't get around to posting. Wednesday night was the Stampin' Up! Catalog Kickoff. What a great time meeting up with friends and making new ones! Such a fun evening! The new Occasions Catalog is full of awesome products - my wish list is ready! We can pre-order beginning today, which is just one of the benefits of being a Demonstrator! Woo hoo!
Now about the card above, which is a gift card holder. It's not just for Christmas. Change the DSP to fit the occasion. Below is an open view, with a peek at the gift card insert. It was made with the Envelope Punch Board. I used the retired Slot Punch to keep the gift card in place.
The Hostess Club members made this card at our meeting last month. Watch France Martin's video HERE for directions to make a batch of gift card holders to have on hand for the holidays - or any day.
Must go place my pre-order now! Have a great weekend and thanks for coming by for a visit today!
Now about the card above, which is a gift card holder. It's not just for Christmas. Change the DSP to fit the occasion. Below is an open view, with a peek at the gift card insert. It was made with the Envelope Punch Board. I used the retired Slot Punch to keep the gift card in place.
The Hostess Club members made this card at our meeting last month. Watch France Martin's video HERE for directions to make a batch of gift card holders to have on hand for the holidays - or any day.
Must go place my pre-order now! Have a great weekend and thanks for coming by for a visit today!
Monday, May 12, 2014
Hi there! Hope all the moms out there had a great Mother's Day. I sure did - and the weather was gorgeous! Had lunch with my youngest daughter and son-in-law. The oldest daughter left Saturday for her international tour job and our son was also working. It was still a wonderful day which included seeing the granddog, Rocky. He loved the treats that I had for him. (Oh, but these were not just any treats! These were healthy, homemade treats that our granddaughter helped me bake a few weeks ago.)
OK, enought chit chat. Let's get to the card. It's another sample from our Card Buffet, which shows the versitility of the Scallop Tag Topper Punch from the 2014 Stampin' Up! Occasions Catalog. I watched Dee Slater's video to learn how to make this unique closure. The rest of the card is my own design. There are numerous videos on the internet with instructions but I chose Dee's. You can view her video here (scroll down to Jan 27 post). Give this technique a try. It's actually very easy!
Had a chance to play with some of the new goodies that Mr. Brown delivered - mostly the Blendabilities. Love them! Come back tomorrow to see what I did. Must sign off now to take care of some chores. Thank you so much for peeking in today!
OK, enought chit chat. Let's get to the card. It's another sample from our Card Buffet, which shows the versitility of the Scallop Tag Topper Punch from the 2014 Stampin' Up! Occasions Catalog. I watched Dee Slater's video to learn how to make this unique closure. The rest of the card is my own design. There are numerous videos on the internet with instructions but I chose Dee's. You can view her video here (scroll down to Jan 27 post). Give this technique a try. It's actually very easy!
Had a chance to play with some of the new goodies that Mr. Brown delivered - mostly the Blendabilities. Love them! Come back tomorrow to see what I did. Must sign off now to take care of some chores. Thank you so much for peeking in today!
Stampin' Up! supplies used unless otherwise noted.
Stamps: Petite
Petals, Everything Eleanor (swirl image)
Paper: Black, Rose Red, Vanilla,
Pink Pirouette, Modern Medley DSP
Ink: Black Memento
Tools: Scallop Tag Topper Punch, Oval Framelits (#3 from
center), Petite Petal Punch, standard hole punch (for flower centers)
Other: Dimensionals, Black 1/4" Satin ribbon (non-SU),
glue pen or glue dots, clear blocks
Tuesday, March 11, 2014
Foxy Birthday
Hi there! Back today with another sample from our Card Buffet made with the Life in the Forest set found in the 2014 Stampin' Up! Occasions Catalog. I'm loving this set! The images can be used to make cute, whimsical cards (or scrapbook pages). And how about that sentiment?! It's from the Just Sayin' stamp set and cut out with the coordinating Word Bubbles Framelits, which can also found in the Occasions Catalog. You can buy them separately or as a bundle. Buy the bundle and save yourself some moolah! Just sayin'.....
Have a great day and thank you for stopping in for a visit today!
All Stampin' Up! supplies used unless otherwise noted.
Stamps: Life
in the Forest, Just Sayin’ (sentiment - You’re
How Old?)
Paper: Crumb
Cake, Garden Green, Early Espresso, Vanilla
Ink: Crumb
Cake, Garden Green, Soft Suede, Soft Suede marker
Tools: Chevron embossing folder, Deco Labels Framelits,
Word Bubbles Framelits, Circle Framelit (#5 from center), snips
Other: Dimensionals, sponges, clear blocks
Monday, March 10, 2014
It's All About the Gold
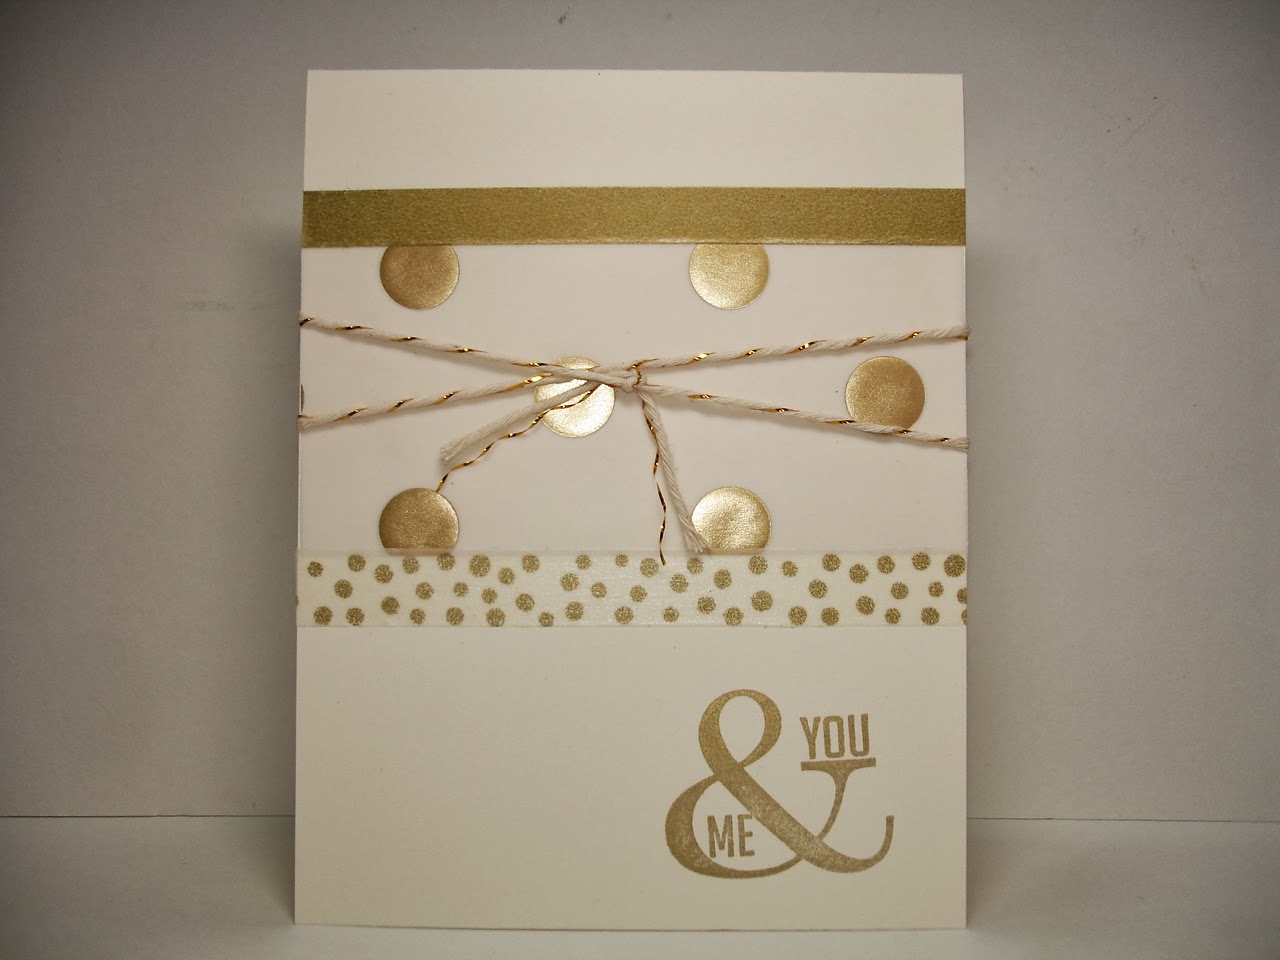
Hi there! Hope you had a good weekend! My to-do list is very long so let's move on to the card, shall we? It is another Card Buffet selection using the beautiful Fancy
Foil Designer Gold Vellum by Stampin' Up!, which can be found in the 2014 Occasions Catalog. This could be a Valentine or anniversary card. The ladies could also choose to use the "hi" sentiment from Regarding Dahlias. My card is pretty much a CASE of Jodi Reinert's card here (Jan 4th post), except that I used a different sentiment and added some gold Washi tape. Gold Baker's Twine was the finishing touch. Love all these gold elements in the Occasions Catalog! They come in Silver, too.
Oh! A hint for adhering the vellum if you aren't using Washi tape, is to put glue on the back of the gold dots.
That's it for now. Thanks for stopping in for a peek today!
Oh! A hint for adhering the vellum if you aren't using Washi tape, is to put glue on the back of the gold dots.
That's it for now. Thanks for stopping in for a peek today!
All Stampin' Up! supplies used unless otherwise noted.
Stamps: Perfect
Pennants (sentiment – you & me) OR
use “hi” from Regarding Dahlias
Paper: Vanilla,
Fancy Foil Designer Gold Vellum (2014 Occasions Catalog – pg 23)
Ink: Encore Gold
Other: Gold
Bakers Twine, gold Washi tape, clear block
Wednesday, March 5, 2014
Cheer Up, Buttercup!
Hi there! Hope it's warming up where you live. It's supposed to get up into the 40's today, so I'll be getting out to run some errands. But first, let's talk about the above card that was displayed on our Card Buffet this past Saturday. The narrow strip on the left side is a piece of Sweet Sorbet Designer Series Paper. Love this DSP! You can get it FREE until March 31st with a $50 Stampin' Up! purchase (before tax and s/h). The other piece (under the sentiment) was stamped with images from the Petal Parade set (another SAB freebie). They are so similar (except for the black specks), that the ladies at the Buffet were looking for another piece of DSP in their kit. Speaking of the sentiment, it is called Geometrical and can be found in the Occasions catalog. Love this, too! Another Sale-A-Bration freebie is the twine that comes in the Sweet Sorbet Accessory Pack. This twine is a little thicker than our Baker's twine. You also receive a spool of Pool Party twine and cork embellishments in the pack.
Normally, I don't stamp the inside of my cards or round the corners. This time I did and below is the result. What do you think?
That's it for now. Thank you for stopping in for a look today!
Other: Crisp Cantaloupe twine & Summer Starfruit twine (Sweet Sorbet Accessory Pack - SAB freebie), Dimensionals, clear block
Normally, I don't stamp the inside of my cards or round the corners. This time I did and below is the result. What do you think?
That's it for now. Thank you for stopping in for a look today!
All Stampin' Up! supplies used unless otherwise noted.
Stamps: Petal
Parade (2014 Sale-A-Bration
freebie), Geometrical (sentiment – cheer up Buttercup)
Paper: Cantaloupe
Crisp, Black, White, Sweet Sorbet DSP (2014 SAB freebie)
Ink: Cantaloupe
Crisp, Pistachio Pudding, Summer Starfruit, Black StazOn
Tools: Corner Chomper (non-SU) Other: Crisp Cantaloupe twine & Summer Starfruit twine (Sweet Sorbet Accessory Pack - SAB freebie), Dimensionals, clear block
Monday, February 24, 2014
8x8 Scrapbooking
Hi there! Hope you had a wonderful weekend. Mine was absolutely awesome! You can read more about it at the end of this post, if you wish. Something new today - a scrapbook page! After I started making
cards, scrapbooking kind of fell by the wayside. The Hostess for my Friday
evening Workshop mentioned there were a few scrapbookers in the group who would like to see how to incorporate stamping into their
scrapbooks. The above page was one sample I made using the See Ya Later stamp set that you can earn for Free with a $50 purchase (before tax & s/h). The "clouds" were cut out with the Word Bubbles Framelits and embossed with the Fancy Fan embossing folder. The sun "rays" were punched out from the new Triangle punch that can be found in the 2014 Stampin' Up! Occasions Catalog. The "rays" were adhered to the back of a 1-3/4" circle punched from Polka Dot Parade Designer Series Paper. The colors used on the sample page are Smoky Slate and Daffodil Delight.
My fun filled weekend began Thursday after picking up Daughter #1 from the airport. We ran a couple of errands, then met up with Baby Girl, her BFF, Baby Girl's fiance, his brother, and his BFF. I didn't get home until around midnight. Friday night was my Workshop - another late night. I had a blast with this super FUN group of ladies! Thank you ladies! This is why I LOVE my job!!! Saturday morning was the Bachelorette party for Baby Girl. (Baby Girl's fiance had his bachelor party the same day/night.) We met at her BFF/Maid of Honor's house to board a bus, then headed to the Montelle Winery in Augusta. What gorgeous weather we had for sitting out on the deck - and what a beautiful view! We had such an awesome time! The bus had to be back at BFF's house by 5:30 pm, so we only had time to stop at one other winery - Sugar Creek Winery. The day just flew by! We continued the party at BFF's house. Most everyone left by 9:30 pm but it seemed later since we started at 10 am. My girls and I spent the night at BFF's house. We met the guys for brunch the next day, then went to Baby Girl and her fiance's house to "watch" the Daytona 500 with fiance's family. We had such a good time - lots of laughs and funny stories. We all left their house about 9 pm. Everyone was so tired. Today I dropped off Daughter #1 at the airport around noon. Tonight will definitely be an early night! Hope I can stay awake through The Bachelor (a reality show). Ha!
Need to sign off for now. Thank you for stopping by today and hanging in there with me on this long post!
My fun filled weekend began Thursday after picking up Daughter #1 from the airport. We ran a couple of errands, then met up with Baby Girl, her BFF, Baby Girl's fiance, his brother, and his BFF. I didn't get home until around midnight. Friday night was my Workshop - another late night. I had a blast with this super FUN group of ladies! Thank you ladies! This is why I LOVE my job!!! Saturday morning was the Bachelorette party for Baby Girl. (Baby Girl's fiance had his bachelor party the same day/night.) We met at her BFF/Maid of Honor's house to board a bus, then headed to the Montelle Winery in Augusta. What gorgeous weather we had for sitting out on the deck - and what a beautiful view! We had such an awesome time! The bus had to be back at BFF's house by 5:30 pm, so we only had time to stop at one other winery - Sugar Creek Winery. The day just flew by! We continued the party at BFF's house. Most everyone left by 9:30 pm but it seemed later since we started at 10 am. My girls and I spent the night at BFF's house. We met the guys for brunch the next day, then went to Baby Girl and her fiance's house to "watch" the Daytona 500 with fiance's family. We had such a good time - lots of laughs and funny stories. We all left their house about 9 pm. Everyone was so tired. Today I dropped off Daughter #1 at the airport around noon. Tonight will definitely be an early night! Hope I can stay awake through The Bachelor (a reality show). Ha!
Need to sign off for now. Thank you for stopping by today and hanging in there with me on this long post!
Friday, February 14, 2014
Love You to the Moon
Hi there and Happy Valentine's Day! We're getting snow....again, which may keep a lot of couples home tonight rather than go out to celebrate the day of love. Mother Nature has certainly been wicked this year!
Since it's Valentine's Day, I'm sharing an appropriate card made with Love You to the Moon. This stamp set can be found in the Stampin' Up! 2014 Occasions Catalog. When I saw this set, I knew it had to be mine. My granddaughter and I use that expression to each other, so it was perfect for her card. (Just noticed that my stamping is a bit wonky. Well, that's just so you know we Demonstrators are not perfect like some seem to think! Ha!) The "moon" is a Basic Gray circle embossed with the Decorative Dots embossing folder. Love this new embossing folder! I flipped it over to use the debossed side to mimic the craters of the moon. The "clouds" were cut out with the Word Bubbles Framelits. A bit of Soft Sky ink was added to the edges for more definition.
OK, that's all for today. Hope you have a great weekend and thank you so much for peeking in today!
Since it's Valentine's Day, I'm sharing an appropriate card made with Love You to the Moon. This stamp set can be found in the Stampin' Up! 2014 Occasions Catalog. When I saw this set, I knew it had to be mine. My granddaughter and I use that expression to each other, so it was perfect for her card. (Just noticed that my stamping is a bit wonky. Well, that's just so you know we Demonstrators are not perfect like some seem to think! Ha!) The "moon" is a Basic Gray circle embossed with the Decorative Dots embossing folder. Love this new embossing folder! I flipped it over to use the debossed side to mimic the craters of the moon. The "clouds" were cut out with the Word Bubbles Framelits. A bit of Soft Sky ink was added to the edges for more definition.
OK, that's all for today. Hope you have a great weekend and thank you so much for peeking in today!
Thursday, February 13, 2014
More Spring Fling Swaps
Hi there! Back today with the last of the swaps from Spring Fling held last Saturday. Yesterday I was in a rush to get out the door and didn't mention an important fact. These swaps were just given to me (and a couple of others) without reciprocating! A few of us volunteer Spring Fling helpers didn't have time to make swaps, or at least, that was my reason. These gracious ladies gave us their swap card anyway! Stampers are the BEST! Now for a little info on the above swap, which was from Rebecca Schuder. She used Delicate Doilies for a tone on tone effect in Midnight Muse. The sentiment from the Best of Birthday set was heat embossed with silver embossing powder. Love the Pistachio Pudding and Midnight Muse colors together! The ruffled trim and Delicate Designs embossed border really add a feminine touch.
Next up is a Minion by Peggy Gebhardt. She made him using Stampin' Up! Circle Framelits.
Cute!!! I've been wanting to make this character. Now I have a sample! Thanks Peggy!
The last swap is from Tamara Lobb. She has used the new Hardwood background stamp. It can
be found in the 2014 Occasions Catalog. What a perfect backdrop for this adorable owl made from an oldie but a goodie punch! The sentiment is from a stamp set called Just Sayin' and cut out with the coordinating Word Bubbles Framelits. Both items are from the Occasions Catalog. Tamara stamped the chevron pattern (Tape It stamp set) onto the 7/16" Natural Trim and embellished it with stacked Naturals Designer Buttons. Love it!
There are a gazillion things on my to-do list. Must sign off now. Thank you so much for stopping in for a visit today!
Next up is a Minion by Peggy Gebhardt. She made him using Stampin' Up! Circle Framelits.
Cute!!! I've been wanting to make this character. Now I have a sample! Thanks Peggy!
The last swap is from Tamara Lobb. She has used the new Hardwood background stamp. It can
be found in the 2014 Occasions Catalog. What a perfect backdrop for this adorable owl made from an oldie but a goodie punch! The sentiment is from a stamp set called Just Sayin' and cut out with the coordinating Word Bubbles Framelits. Both items are from the Occasions Catalog. Tamara stamped the chevron pattern (Tape It stamp set) onto the 7/16" Natural Trim and embellished it with stacked Naturals Designer Buttons. Love it!
There are a gazillion things on my to-do list. Must sign off now. Thank you so much for stopping in for a visit today!
Labels:
birthday,
Delicate Designs embossing Folder,
Delicate Doilies,
Framelits,
heat embossing,
Just Sayin,
Minion,
Occasions mini,
owl punch,
Rebecca Schuder,
Spring Fling,
Stampin Up,
Tamara Lobb,
Tape It
Sunday, February 9, 2014
Spring Fling
Hi there! Yesterday I attended a "Spring Fling" event and had a blast! Let me tell ya, it certainly didn't feel like Spring outside! I heard the snow plow come down our street early yesterday morning. That got me out of bed real quick to peek outside to see how much snow had fallen. It wasn't even an inch but I had about 30 miles to travel and snow could make that a scary trip. Fortunately, the roads were fine! Now back to the event.... Sally Nusbaum organizes a few different events for Stampin' Up! Demonstrators throughout the year, usually after the debut of a new catalog. There are demonstrations, make n takes, business information, prizes, and card swapping (optional). Oh, and food! The best part, for me at least, is meeting other Demonstrators. Sally's events are so much fun and I have met the nicest people! If you're a Demonstrator and would like to attend, contact me and I'll connect you to Sally. She does an awesome job! So with all that said, the above packaged plastic shovel is one of the favors we received. Isn't that just too cute? We also received this one shown below.
This little cutie holds a square of Ghiradelli chocolate. Yum! It was made using the new Angled Tag Topper punch, gold Washi tape, and gold Baker's Twine - all from the 2014 Occasions Catalog. The next favor designed by Kim Coulter is my personal favorite.
What a gorgeous presentation! That rose was made using the new Spiral Flower Originals Die. Polka dot Gold Fancy Foil Designer Vellum was cut from a Starburst Framelit. (Each package of Designer Vellum contains 3 sheets of 3 different designs) The branch of leaves (bird punch found in Annual Catalog) and banner (new Framelits) were made from our Foil Sheets found on page 23 of the Occasions Catalog. The Chevron print kraft bag is a product that appears in the Annual Catalog on page 158 and the Tea Lace Paper Doilies can be found on page 156. What's inside the bag you ask? Samples of both gold and silver Designer Vellum, gold and silver Baker's Twine, Mini Metallic Clothespins, Silver 1/8" Ribbon, and Gold Sequin Trim!
Are you seeing a theme here? lol It was gold, silver, and red.
Tomorrow I'll share the make n take projects. Thanks for stopping in today!
This little cutie holds a square of Ghiradelli chocolate. Yum! It was made using the new Angled Tag Topper punch, gold Washi tape, and gold Baker's Twine - all from the 2014 Occasions Catalog. The next favor designed by Kim Coulter is my personal favorite.
What a gorgeous presentation! That rose was made using the new Spiral Flower Originals Die. Polka dot Gold Fancy Foil Designer Vellum was cut from a Starburst Framelit. (Each package of Designer Vellum contains 3 sheets of 3 different designs) The branch of leaves (bird punch found in Annual Catalog) and banner (new Framelits) were made from our Foil Sheets found on page 23 of the Occasions Catalog. The Chevron print kraft bag is a product that appears in the Annual Catalog on page 158 and the Tea Lace Paper Doilies can be found on page 156. What's inside the bag you ask? Samples of both gold and silver Designer Vellum, gold and silver Baker's Twine, Mini Metallic Clothespins, Silver 1/8" Ribbon, and Gold Sequin Trim!
Are you seeing a theme here? lol It was gold, silver, and red.
Tomorrow I'll share the make n take projects. Thanks for stopping in today!
Friday, February 7, 2014
Bokeh
Hi there and happy Friday! Here's another technique we learned at the retreat last month. Cheryl Renth showed us how to do bokey (pronounced bo KAY), which is a background technique borrowed from the photography world. You can watch this video to learn how to make your own works of art. The polaroid looking frame and camera were cut from a new product called On Film Framelits, which appears in the 2014 Stampin' Up! Occasions Catalog.
Here is the second sample we did, which is my favorite color combination.
The Silver Glimmer butterfly really adds the finishing touch! The sentiment from Best of Greetings was stamped and punched out with the Decorative Label punch.
That's all for now. Have a great weekend and thank you for stopping in to visit!
Here is the second sample we did, which is my favorite color combination.
The Silver Glimmer butterfly really adds the finishing touch! The sentiment from Best of Greetings was stamped and punched out with the Decorative Label punch.
That's all for now. Have a great weekend and thank you for stopping in to visit!
Subscribe to:
Posts (Atom)